The worst thing you can do is stay on the same course that keeps you cycling through pain. I did this for years and was always left frustrated when the pain would return. The problem with what I was doing then was only using one approach. I would find something that made sense to what I was dealing with and I would ware it out. Whether it was working or not it didn’t matter. Someone told me it would work so I stuck with it. Well this isn’t always the case. Sometimes you need to know when to let go and when to keep going. Todays post is an update on what I have switched to as of 11/15/15 to improve the pain I am currently dealing with or to make my pain management that much better.
I am going to give you 3 key players that have been huge help!
I am sold on the fact that anyone is able to live 100% pain free. Even if I still have bad days years after starting this pain management journey. The reason for that is because I still have days, weeks and even months where I have no pain. Why would it hurt one day and not the next? To be honest it’s never just one answer. It could be from posture, poor habits, standing, sitting or damage I wasn’t aware of that I keep irritating without even knowing it.
The main point to all of this is that you have to continue to educate yourself on your own body. If your still in pain and you can’t seem to shake whatever it is that you have, go find the best specialist that aligns with your beliefs (if you have been on here for any period of time it should be natural, none medicated and surgical relief). Let them take a second look. What used to be a ruptured disc could now be either pars/pedicle damage to the spine. That’s a big deal. It’s still curable but your dealing with a different monster now. You have to be able to adjust course and continue to search for that next step.
I have recently been experimenting with a few new techniques and approaches to fine tune my back pain and I wanted to share them with you. Below I will explain what it is and why I am using it.
Foundation Training
Foundation: Redefine Your Core, Conquer Back Pain, and Move with Confidence

I recently purchased this book off of a recommendation from another person working through their own back pain. I was skeptical at first but that’s how I found Dr. Stuart McGill so I had to give it a shot. I picked up the book, glanced through it and ignorantly started going through the exercises. Yeah, it messed me up pretty bad. It was dumb of me for just jumping into a new program knowing my back was sensitive to certain positions.
90% of my pain is with extension. I remember when I would have crucial muscles cramps all over my hips and back for the longest time. Thanks to the McGill Method that isn’t the case any more. Now what seems to be an ongoing issue is a constant dull “bone pain” in extension. What makes this worse is that I have lordosis (duck butt) so imagine a constant pressure on my lower back while standing or sitting all day then adding in extension making my pain worse. It sucks but it was just something that I needed to start addressing. After that failed attempt at using the Foundation Protocal I gave it up until just recently after reviewing some of the videos online about it. I was doing the key movements all wrong, which is why I was experiencing so much pain. After doing more research and actually taking the time to learn the basic starter move (The Founder), I was finally able go through the movement without any pain.
My key focus with this program was to find something I could add to work the posterior chain along with the McGill Big 3. Some of you may find the Founder (once perfected) to feel better on the lower back compared to the Bird Dog. Either way, both are excellent posterior chain activators. What I have noticed more using the Founder exercises is my lower back tightness does not flare up as long as I take the movement slow and I am cautious of body position.
This is the exact video that helped me really understand how the Founder worked and how to do it.
There are more exercises that Foundation Training is based around but for now I want you to perfect this move and let me know how it goes!
Hip Flexors
The majority of Americans have tight hip flexors, some people just don’t suffer from the pain that having tight hip flexors can produce. I am not one of those people. Because of my ruptured disc my tight hip flexors have their say in how much pain I will be in, if any. I know this because of the pieces of the puzzle I have been putting together regarding the type of pain I deal with, my pain history, both successes and failures with treatment along with some guidance from people who are way smarter than me. I say all this not just tell you what I deal with, I want you to see the way I think and process my pain journey and how I am constantly growing and improving what I am doing based off of my own observation and education. You can do the exact same thing!
For me specifically, I know I needed to fix my lordosis. It’s something I never really paid that much mind to until now. Like any of you, I don’t have 3 hours a day to be able to lay around on a gym floor and do mobility work and strengthening exercises. My time has to be very intentional. So now that I have had some successes with continuing to use the McGill Big 3, I can start adding new focuses to my program.
So, what I have taken on now is direct hip flexor trigger release and stretching daily. I keep it simple and stick to what I know works. For starters I try to get a good 10 min fast paced walk in before starting.
I’ll do this stretch either using a wall or a couch
A little extra trick I like to add to this is to lean slightly away from the leg that is stretched behind me. This puts more space between the bottom of your rib cage and the top of the hip.
Another really good one if your not around a couch or the wall version is a bit intense, I do this modified hip flexor stretch using a jump stretch band. You can also use a jump rope or any kind of rope really.
Make sure your core is engaged and you’re not putting too much pressure on your lower back being in extension.
Aligning my spine while I slept.
Sleep is huge when it comes to repairing inflamed joints and snapped up backs. What sucks is when your bed is so bad, you go to sleep thinking the morning will be better when in reality it’s not. You repeat this vicious cycle of waking with pain just to spend half of the day trying to recover from what your sleep put you in. In my case I have been working hard on spine stability. The problem I found was when I slept, the curve indent in my mattress would offset my spine and put me into this hyper sensitive state for the first half of the day. I know that sounds crazy but I take my pain relief serious and will not leave a single stone unturned.
I don’t have a bad mattress, it’s actually only about 3 years old. What I do have is a plush mattress which for me is not good. I need either a higher end mattress that doesn’t show ware even with a couple years on it or a more firm mattress. So long story short I needed a way to level out my hips while I slept so that inflamed joint could heal while I sleep.
This is what I did
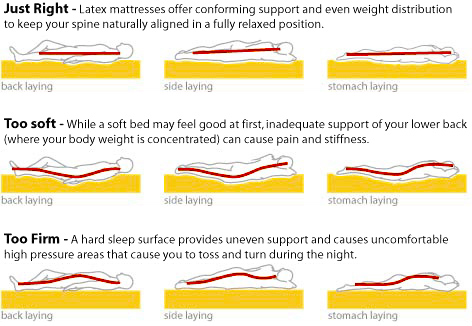
My area of focus is on the middle section of this picture. The guy right in the middle is me 100%. By placing a firmer support under the “bid body” section helped lift the hips and align the spine.
I experimented with using blankets or towels placed strategically where my hips would be on the mattress. I had to play around with the thickness to get it right. What I used as a guide was the sensation of pain. Before this I would lay on my side to sleep and would have to slowly relax my torso because of the irritation I would feel from my lower spine being uneven from laying on the bed. When I would find the right height and placement of the support I would have ZERO pain when I laid down and relaxed my torso and hip area. This has made a HUGE difference in not only the quality of sleep but how I feel in the morning. Since I have done this I have noticed less discomfort at night and in the morning and I am able to sleep more without waking up to flip over (only battle now is waking up to my 2.5 year old yelling my name to come tuck her back in at 2am haha). All in all taking away that pain trigger has improved the most essential thing to my recovery, sleep.
I try not to take on too many things at once so that I can really tell if what I am doing is working. I hope this post has inspired you to take a second look at what your doing especially if your still dealing with pain after months of working through any rehab exercises.
Be sure to let me know how these work for you or any extra tips you can add!
Thanks for reading
William

Health-aware people need to take proactive steps. Especially nowadays when so much time is spent sitting in front of flatscreens. On the other hand, the economy is tough, and the average person can expect to pay $60 to $90 for an hour massage, while the cost of chiropractic care ranges from $40 to $100 per session.
Thanks for sharing this.