Ah, the bird dog, the exercise I used to point and laugh at and only prescribe to anyone 90 years or older. Now, I find myself making sure some sort of bird dog is in every warm up that I do. I guess that’s the fitness industry paying me back for so many years of busting jokes.
The Bird Dog is the most basic of basic exercises to building lower back and posterior chain stability. If you’re currently trying to rehab your bad back and your not doing these I hope and pray you have a darn good reason. In todays post I want to make sure you walk away with two important “How To’s” when it comes to the Bird Dog.
- How to do the Bird Dog from start to finish like a pro
- How to trouble shoot the Bird Dog to make it fit your current level of pain
The Bird Dog is an exercise that looks super easy but can be jacked up in so many ways. If you are the average pain free person sure, you can swing your arms and legs a couple times and pull it off with no problem but for us pain riddled individuals, we need to be super careful how we execute this move. Before you start doing anything prescribed on this site it’s really important to lean what your pain triggers are. I can’t stress that enough. If you really don’t know what is making your pain worse then you really won’t get anywhere with this exercise.
So step one: Figure out what positions are making your pain worse.
Once you have an idea and you’re confident in going forward, than the Bird Dog is the icing on this 3 exercise cake. It’s main contribution is desensitizing back pain. It teaches proper motion in the shoulders and hips while maintaining a neutral spine. It’s one of a few exercises that can actually challenge the lumbar and thoracic portions of the spine in a way that is helpful for those with back pain.
Getting in position
This exercise is done on all fours (hands and knees). Your number one goal before even starting is to get the spine in a pain free position. To do this simply rock your hips back and forth or use the cat/camel stretch to narrow in on your sweet spot. Once you find your pain free zone, be sure there is a slight curve to the spine and lock the position in by contracting your abdominals. You also want to make sure your knees are directly under your hips and your hands directly under your shoulder.
Before starting, do a mental check of three key things
1. Am I in a pain free position?
2. Are my hands directly under my shoulders and evenly spaced out?
3. Are my knees directly under my hips and are they evenly spaced out?
How to do the Bird Dog
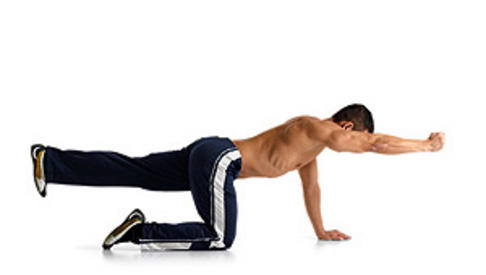
The basic level of this exercise begins on all fours and straightening the left (or right) arm along with the opposite leg to the arm that is stretched out. You want to focus on keeping equal weight spread between the arm and leg that is still on the ground. An imbalance in weight can lead to hiking the hip which causes twisting in the spine. Once your limbs are raised your goal is to hold the position for 6-8 seconds and return them to the “all fours position” before going into the next rep. The first progression of this exercise would be to sweep the hands and knee into the next rep instead of pausing and putting weight back on all fours. To do this, simply sweep the knee and hands across the floor after the first 6-8 seconds and immediately go back into the next 6-8 second hold.
Spine position is very important with this exercise. For those of you who tend to have more pain with extension (Me!). You really need to watch how bunched up your lower back is. If there is too much of an arch you will experience pain from the hiking back of the leg which may cause pressure on the lower back. You always want to first find your spines sweet spot, lock that in with a solid abdominal contraction than start with the movements. Don’t allow the movement to take you out of that neutral spine position. I always suggest doing this in front of a mirror so that you can adjust yourself while your doing it.
If your back is super sensitive you can focus solely on the leg or arm by it’s self. For the worst backs you can start with just moving the arm. Your next progression would be moving just the leg. After that (as long as you can do them pain free) then you can start to incorporate both the arm and leg at the same time.
How Much Should I do.
Just like the McGill Crunch and Side Plank, you want to create a set/rep range that both fits your pain tolerance and follows the descending pyramid structure. A good place to start would be 3-4 reps of 6-8 second holds of whichever version you can handle. You want to do 3-4 reps on each side of the body while resting 30 seconds between each set.
Basics to Bird Dog descending pyramid:
1st set : 4 reps with 6-8 second hold
2nd set: 3 reps with 6-8 second hold
3rd set: 2 reps with 6-8 second hold
4th set: 1 rep with 6-8 second hold
Finished.
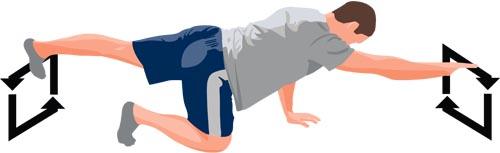
As you get better and better with less and less pain you can add difficulty by increasing 1 rep for each set. Keep the hold time maxed at 10 seconds until you have absolutely zero pain. If you have seen a drastic amount of improvement in pain you can make the exercise even more challenging by drawling squares (like you see above), while in the extended position. Each square you draw should be no bigger than a foot on each side. Of course this is an imaginary square we’re talking about here. 😉
Fine Tuning the Bird Dog
This specific exercise has given me the most trouble personally. Due to a lot of my own personal pain triggers being based around extension I have to be very careful how fast I try to progress with this exercise. On top of that I personally will experience more pain then the average person days after if my spine slipped into too much extension during the workout. Through my experience and research I have narrowed down the most common mistakes made with the bird dog and how you can fix them.
1) Not having accountability: It is extremely important to know whether or not your able to do these successfully or not. The wrong form can result in constant pain you can’t shake. What I have found helpful is to do them in front of a mirror. After studying proper form you sometimes have a better idea of what is feels right vs a friend telling you how you look. Perfection is what your lokoing for and the only judge of that is your own personal pain.
2) Test, test and retest: Finding your sweet spot is important. Don’t give up if your experiencing pain with this exercise. Break it down to its most simplest form if you have to and start from there.
3) Learn proper muscle contraction: Sometime in order to do this exercise pain free you have to enhance the muscle contraction while doing it. You can do this in two ways.
- Clench the fist when it is straightened. This will ensure a more supportive contraction through the upper to mid back.
- Push the heel AWAY from the body and flex the foot (point your toes in which will flatten the foot) when it is stretched out. This will have more butt, hamstring and lower back contraction.
4) Higher isn’t better: As you progress don’t think that lifting the legs and arms higher will support stronger results. It’s actually the opposite. You want your heel to be level with your hips and your arm to be level with your shoulder. Nothing more. Doing less will only be because of pain management.
5) Slow down: I say this over and over but I see it too often to stop. Rehabbing a bad back takes attention to detail. It’s easier to make your pain worse than it is to make it better when it comes to using exercise to bring yourself back to good health. Never forget that. That’s why understanding what triggers your pain and staying below your pain capacity is your ticket to recovering fast. Don’t rush the exercise just to get it done. This is your workout. It may be the only thing you do for the next 6 months so take it serious.
Back pain can be extremely frustrating. Believe me. I started this site to show people what I learn from research and personal experience. By no means am I 100% without pain. Just like you, I am improving as much and as often as I can. I wouldn’t share anything with you that either hasn’t been proven by science or hasn’t helped me in any way. If it works then you will hear about it!
Thanks for reading guys and be sure to subscribe below to get exclusive content delivered right to your inbox!
ttys,
William

Very good coaching points on speed, position and “feel”.
What is the purpose of the squares? Better joint mobility? I find stretching the fingers away from the toes provides some spinal separation. I’m sure it’s not as good as hanging upside down, but that’s not really the point of the exercise.
I dealt with a bit of back pain back in the trades. Luckily exercise has improved my body, as well as not doing that type of work everyday. I continue to use this exercise, and variations of it, in my warmups.
Hey David,
Nothing really scientific about the squares other than just changing the dynamic of the exercise. In my experience with people who deal with chronic low back pain once you add in movement things start to fall apart. This is a great way to challenge the bracing sequence with subtle movement. Thanks for checking it out and commenting!
William
Hello,
Loved this instructuon on the bird dog . I have a question: I am a back-pained individual who had a bad back pain spasm episode this past January. I’m 53 so it takes a long time to recover. When I watch videos on the McGill Bird dog, and listen to my McGill instructor, everyone says to push your upper body away from the floor, so your scapulae do not retract (sag). In order to hold this position my body shakes because I have to exert a lot of effort, as if you are in the staring position of a push up. Is this correct, or am I overdoing it? I don’t want to hurt myself.
Thanks, Kevin
Hey Kevin,
I would need to see how you’re doing the exercise. Shaking may come from being weak but again it comes down to your position. Can you send me a video? Feel free to post it to my facebook page! https://www.facebook.com/fitness4backpain/
Awesome information,easy to understand an easy effective exercise which targets the core. Will gives you helpful guidelines for what level/stage your fitness / back pain.
Thanks 🙂