So, we know exercises like crunches, sit ups and leg raises are terrible for a bad back. If you’re trying to rehab your back the first thing you need to focus on is your foundation. I have mentioned it a few times on this site about the “McGill Big 3”. What I want to do now is break down the first exercise in the group, The McGill Curl Up (also known as the McGill Crunch). I am going to go over technique, form and why you could be making your back worse by doing the very thing that is supposed to make it better.
2 Things you will get out of this article
- How to do it from a-z. Great if this is your first time hearing about the McGill Crunch
- How to improve what you’re doing and fine tune the exercise if you’re doing it now and you’re still experiencing pain.
The McGill Curl Up (also known as the McGill Crunch) is the most basic of basic core exercises. It really doesn’t even come close to actually looking like a true crunch but it’s ability to rebuild a bad back is powerful. The goal with this exercise is to re-wire your spine stabilizers to know what a neutral spine really is.
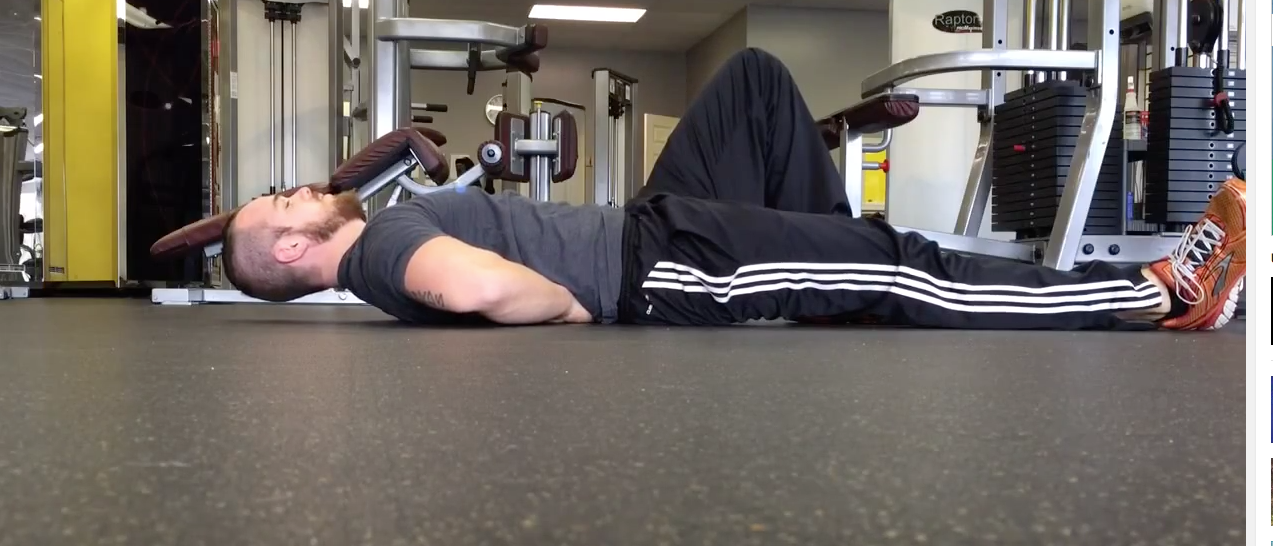
Getting in position
Like you see in the video below, the exercise is done on your back. The key to doing these right is to have zero movement in your lumbar spine. While on your back, slide your hands under the lower back. Your hands are there to help establish a comfortable low back arch so that you don’t end up smashing the lower back into the floor causing more discomfort. Remember, you’re only using the hands to establish a healthy and comfortable curve to your lower back. Straighten one leg out while the other is bent with the foot on the same level as the knee of the outstretched leg. If you look like the relaxed version of he image you see above then your in good shape and ready rock and roll…or crunch.
How to do it
Before doing anything, stiffen the core just enough to prevent any movement in the lumbar area. This is key since the goal of the exercise is to stiffen and build stability to the spine while it’s in a neutral position. Bring the elbows up slightly, just enough so that they are off the ground while at the same time slightly lifting your head. When lifting your head focus on using a neutral cervical spine (neck) and your shoulders to lift the head up, don’t just flex the neck to raise the head off the ground.
Dr. McGill describes it as this: “Imagine your head and shoulders resting on a bathroom scale. The goal of the exercise is to simply make the scale read zero weight.”
If you’re doing it right just about everyone will look at you like your crazy. It really doesn’t look like you’re doing much at all. Just remember, you’re doing this to rebuild a bad back. It starts with baby steps. Follow these basic instructions and I will teach you how to fine tune it below.

How much should I do?
The program for doing these exercises will follow what is known as the Russian Pyramid. It’s a training style that starts with a higher number and for each set drops 1-2 reps until you are only completing 1 rep. Once you hit that one rep you are done for the day or until later. The amount of reps and sets for this exercise will vary depending on your current state of back pain. Regardless of your pain level start with where you are.
Example of Russian Pyramid:
1 Rep = 8-10 second hold
Set 1: 6 Reps, rest 20-30 seconds
Set 2: 4 Reps, rest 20-30 seconds
Set 3: 2 Reps , finished
Remember the top 3 rules of rehabbing a bad back
Don’t do what your friend said worked best for him
Don’t work THROUGH pain thinking the reward is at the end
Tune the exercise to fit your specific needs and pain tolerance
So everything you start with will be 100% experimentation. For the sake of this article I will give you a suggestion. Start with 5-6 repetitions, holding each rep for 8-10 seconds each. Rest for 30 seconds then complete 3-4 repetitions the next set rest for 30 seconds than do 1-2 reps for the final set. Once you hit your last set your done. The progress measurement will be based on how you feel the next day. If the pain is bad then rest a few days and cut it back 1-2 reps. If your pain is under control then add 1 rep to each set. As you get better and better your rep count will increase along with added difficulty and new challenging exercises. Your goal here is NOT to progress to be able to do a ton of McGill crunches. It’s to be able to progress more and more into a pain free life. Allow that to be your measurement of success!

Fine Tuning the McGill Crunch
-I am guilty of messing this exercises up myself. I was doing it wrong for months before I did an audit on myself and checked every detail of what I was doing. If you’re not careful you can keep yourself in a painful state while doing the exact exercise that is supposed to be helping you. I have experienced having to tune and adjust my position according to how I feel that day. Some days I may have a little more irritation in my lower back to the point where I am more sensitive to extension. On these days I have to really make sure I lock in a good hip position as well as a healthy lower back curve. Too much of a curve and I can be in pain while doing them. Too little and I am not rewiring proper mechanics and creating healthy new habits. When tuning this exercise I will normally use my hands to add or take away support to my lumbar spine. I do this by adding more of my hands or adjusting them up or down around the lower back area. It shouldn’t take too much adjustment but your spine has a sweet spot and your goal is to find that sweat spot and lock it in. Listen to your body, it will tell you what it wants.
-When it comes to which leg you have straightened and which one you don’t it really does’t matter. What does matter is the pain your experiencing. If you experience more pain with your right leg straight then stick do doing them with that leg bent. You won’t hurt you progression if you only stick with one leg being bent the whole time. It’s about making your back feel good!
-Pay close attention to how you feel while you’re doing them. If your back pain is worsening or you can’t seem to find a comfortable position re trace your footsteps and make sure you have all the bases covered. If your back is super sensitive you may need to break the full workout up into multiple smaller workouts through out the day. Whatever works for you do it!
-If you are experiencing neck pain then odds are your neck is not conditioned to do the exercise. You can build endurance in your neck by doing a basic neck exercise. Place your fists below your chin and place the tongue on the roof of your mouth right behind your teeth. Stiffen the neck and gently push up into your chin with your fist to add some tension. At the same time push your tongue into the roof of your mouth. This activates the flexor muscle of the neck. Repeat this a few times until you build up enough endurance to be able to complete the McGill Crunch without any neck pain.
-The tension you build in your core should be enough to maintain a neutral and rigid spine. Don’t squeeze to the point where you’re causing pain (I made that mistake a lot)
As you progress you should notice yourself being able to get into and maintain a pain free position while doing the McGill Crunch more often. I used to have to play with my positioning for a few reps before being able to dial in a healthy feeling position. Now I can go right into a good position and successfully maintain it through out the duration of the workout.
Thanks for reading guys and remember to share it with someone you think could benefit from lower back pain relief!
If you have been doing the McGill Crunch for some time now how successful has it been for you? Let me know below!
William


I find when I do the McGill Crunch, my neck shakes more than my core. I don’t have any neck pain when I do the exercise, but definitely a lot of tension. I know you mentioned in your article about doing the fist exercise to strengthen the deep neck flexors, but I have been doing that for a few days now and it doesn’t seem to be helping. Any advice?
Hey Andrea,
With most of my clients if they have discomfort with this exercise I move on to other options like mini leg drops or dead bug variations. The McGill crunch is just one of many that are GREAT for LPB but should not be looked at as the “best” because it really isn’t.
William
Hi William – what are mini leg drops?
Hey Andrea,
I mention the mini march technique in this video starting at the 1-minute mark: https://youtu.be/rPfm9hyWucQ
There are lots of variations to this so disregard the bands I am referring too. You can do them with your hands by your side.
Hi, I have been a follower of your website for a while. My back is currently extension intolerant. It is flexion intolerant as well, but extension seems to be the main trigger atm.
I am doing McGill exercises however I am having trouble with curl up in particular. No matter what I do, it hurts. Not even the exercise but sometimes even getting in the position I feel back getting sensitive. I can describe it like this: when I am on my back with both my knees bent I slowly let one leg go down and that exact moment I can almost feel my back get into extension and start hurting.
Do you have any tips for me? Can I modify the exercise for myself?
Thanks so much!!!
Hey AL,
Thanks for being part of the community! To be honest I gave up on that exercise after a while. It is a great start but I learned that it does not work for everyone. There are a lot of exercises you can do and what I have had the most success with when working with clients is what I tech in Core Essentials. This literally gives you the exact path you should take with core strength if you are flexion/extension intolerant (BTW that is exactly what I was too). Hope this helps