There is a piece to the back pain relief puzzle that a lot of people over look. We feel pain and we immediately go to the source of the pain and expect to find the cause. In some cases that works but we have to look at the body as a whole to really rule stuff out. A commonly over looked strengthening approach to back pain relief is really hitting the supportive muscles in the back. I’m not talking about deadliest, good mornings or hyper extensions either. I think it’s extremely important not to just do more back exercises but truly understand why you’re doing them.
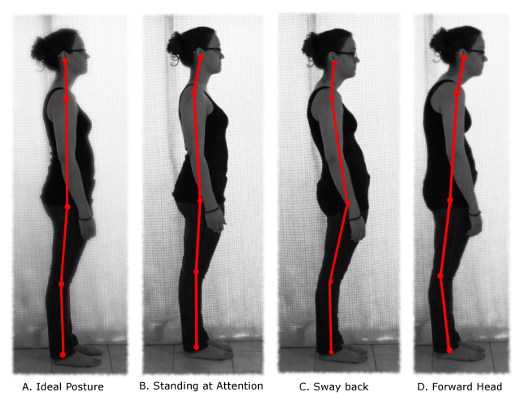
The whole purpose to hitting the back is to keep the body balanced. Too often, the average person gets caught up in the mirror muscles and neglects the back of the body. This leaves people over developed in the front and under developed in the back. It doesn’t stop there though. This imbalance leads to rounded shoulders and a constant flexion based standing position. If your already someone dealing with lower back pain this body position is not going to help out at all! Your center of gravity changes, throwing it out over your feet and causing a constant strain on the lower back.
When it comes to utilizing these 5 exercises the best thing to do is create a routine. Do this routine either every other day while you work to repair the imbalance or work it into your normal workout routine. Ether way just make it a habit!
5 Exercises to Improve Posture and Lower Back Pain
1) Band Pull A-Parts: I do this exercise more often then just on my back dominate days. I use it as a daily warm up and mobility tool as well. When doing this exercise you want to focus on contracting the mid to upper back as hard as you can with each rep. The rest of your core and surrounding muscles need to be braced tight while taking normal breaths through out. The breathing is very important in improving the ability to co-contract. This is when you are stabilizing the spine by bracing with your core muscles while maintaining a steady deep breathing cycle.
2) Face Pulls: These have always been a go-to exercise for me when it comes to building strength and endurance in my back. This exercise is really an all inclusive movement. It hits the major muscles like your traps but most importantly the smaller muscles that lay a little deeper in the back. These muscles include the Rhomboids and Serratus. These are the guys that drawl your scapula back and allows your chest to open up.
3) Neutral Grip Pull Downs: I’m not partial to any specific pull down, as long as you’re doing them than I’m happy. I ‘m personally a fan of the neutral grip simply because it tends to be a lot easier on the shoulders. The primary movers with this exercise are your lats. 3 things could go wrong when it comes to actually using your lats they way you should.
A) You have no clue how to fire them on command
B) They are under developed
C) Suckers are wound up so tight they squeak when you walk.
Either way for the sake of this article you need to make sure they are balanced strength wise. The key thing I want you to pay attention too in this video is my rib cage. You actually see me adjust half way through the video. If you’re dealing with any kind of back pain you want to always remember to keep your spine as neutral as possible. A lot of people will hyper extend their back s and pop their chest out while doing these. Focus on glueing the ribs down and not allowing the weight to separate them at the top.
4) Bench Supported Rows: I’m not going to lie. Bent over rows were my favorite exercise growing up. They are great for developing balance and over all strength in the back. Unfortunately for me being in this position tends to irritate my lower back due to the shear forces acting on my ruptured disc. It’s nothing major just causes a bit of inflammation for the next couple of days. So instead of dealing with that I improvise. I use the bench supported rows all the time as my dominate back exercise. It’s a great overall developer and will always be a staple in any program. In this video you see me doing two different types. The first way is the standard bent over row using dumbbells. The second is my version of the same exercises just with more support for my back. Eventually the goal would be to be able to work up to the unsupported row and not experience and discomfort.
5) Reverse Fly: You can do these a number of different ways. If your having some flexion based pain I would go with the supported style. This is where you’re setting up similar to the supported row but instead you’re doing a slow and controlled reverse fly. The goal with this exercise is not to go heavy or even try to progress to heavier weight. The smaller muscles your hitting can only handle but so much before other surrounding muscles take over and your body begins to compensate. Stick to lighter weight with slow and strong contractions. At each high point you want to be able to hold the exercise for a “One Thousand” count. So, it’s not a full 2 seconds but its just long enough to engage the muscles and keep them under tension.
How to Program Your Back Exercises Into Your Workout
It really comes down to how you put your program together. I prefer to hit multiple muscle groups every time I workout. I do this to keep my self balanced and honest when it comes to working my weakness and not over working my strengths. For days where I am working both my chest and my back I will follow a 3:1 ratio. That is 3 back exercises for every 1 chest exercise. If you’re really trying to correct your posture you need to be aggressive with it. The 3:1 ratio will do just that!
When starting out, doing some light foam rolling on the mid to upper back (NEVER FOAM ROLL YOUR LOWER BACK. I don’t care how “good” it feels). After foam rolling I always do the band pull a-parts first. This gets the back warmed up along with the shoulders. After that Ill go to my heaviest exercise which is usually the Row or Pull Down variation. After doing 3-4 sets of that is when I will start hitting the smaller muscle groups such as the face pulls, reverse fly and maybe more band pull a-parts. You don’t want to hit the small guys first because you need those to be firing on all cylinders to act as stabilizers while moving the heavier weight during the big exercises.
Remember the key thing is to listen to your body and take notes on how you recover days after. During your workout odds are you won’t be in much pain. If you did something wrong your body will let you know a couple days after. Make note of this and make the necessary changes for the future.
Note on Reps and Sets:
Depending on what you’re training for will determine what rep range you hang out in. For someone recovering from back pain and is in more of a rehab phase I would still to strictly endurance style training. This means focusing on slow tight contractions with higher reps and lower weight. Focus on perfect form and reproving any potential habits to use momentum instead of brute strength. If your back is feeling good but you still want to play it safe, you can start to add a bit more weight while cycling your reps between 6-12.
Just remember to keep the emphasis on endurance over strength is you’re rehabbing abad back.
What exercise have you noticed bothers you the most when it comes to working out? Be sure to let me know in the comments below!
TTYS,
William

For improve Lower Back Pain your article is excellent. I am following your tips and i think i improve and feel better now. and thanks for your video tutorial for exercise. Now i can make my exercise by follow your video instructions.