Before we jump in be sure to pick up my FREE Fusion resource below!
Okay, so enough with the yoga and geriatric strengthening exercises targeted towards people with fusions.
If you have had your spine fused it is super important that you take the time and focus on rebuilding/strengthening your core (I am sure you already know that). What seems to be a common theme is that having a fused spine comes with A LOT of fear and anxiety of making a mistake. You don’t want to hurt yourself, you don’t want to make the area worse or even worse have to have the surgery a second time. These are all very real fears but I don’t want that fear to keep you stuck not doing anything or only doing the exercises your PT gave you 5 years ago.
It’s time to move on. It’s time to get stronger and prove to yourself that you are not fragile. In this article, I am going to give you my top 10 core exercises to build strength back in your core after a spinal fusion.
Now, I have 2 versions of this post one is a video that you can watch below and if you continue reading through to the end of this article you will see that I have broken it down for each exercise! Pick which one you prefer and dive in!
Top 10 Core Exercise Safe For Spinal Fusions!
Remember guys always make sure you are cleared to exercise before trying ANYTHING. If you have had your spine operated on always use common sense and listen to your body. If you have any questions about a certain exercise consult with your trusted provider!
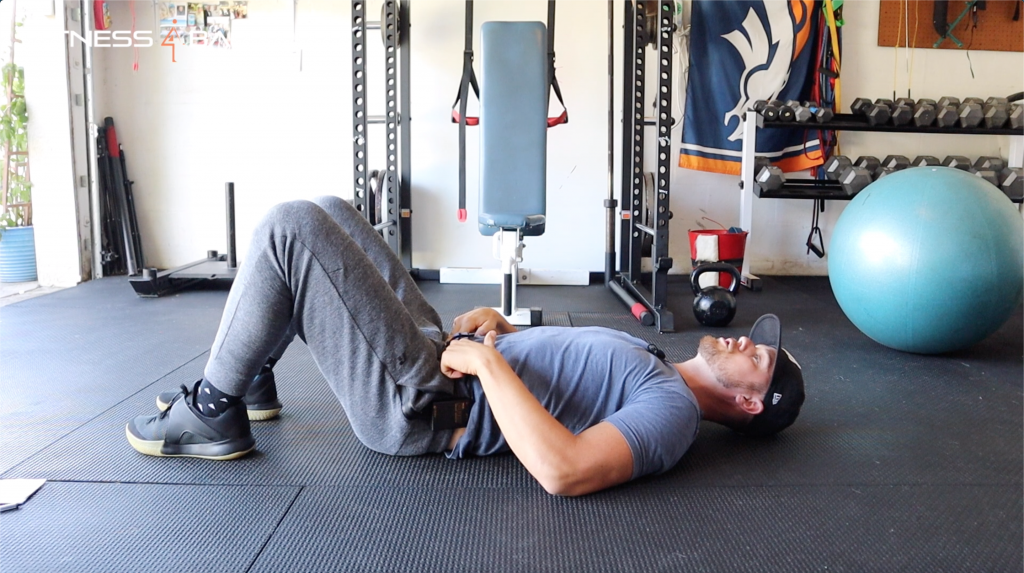
#1 Deep Core Locking

Muscle Group Worked: Deep Core (Transverse, Pelvic floor)
The set up:
This is literally the easiest core exercise you will ever do yet essential if you have had a spinal fusion. It looks boring and feels very elementary but it’s critical for building strength and awareness in the pelvic floor and other deep core muscles.
Don’t skip it!
Lay flat on your back with your knees bent as you see in the image above. Bring your pelvis neutral and make sure your ribs are pulled down. No need for a brace here just make sure your trunk is aligned. Take your two hands and slide your pointer and middle finger over the top of the boney spots on the front of your pelvis (you can see this in the video better). You will know your fingers are in place when you move over that boney structure and you feel that same landmark now at the base of your fingers.
The Movement:
There really isn’t any movement going on that anyone will see from the outside. So focus less on what it “looks like” and spend more time with how it feels. Get all up in those feels 😉
What to look for:
The big take away with this exercise is to know what muscle groups you’re working and when I say “know” I mean feel. Don’t just go through the motions but really try to pay attention to the deep pelvic floor muscles and how you are contracting and relaxing them as you breathe. The video above goes into more detail with this movement on when to pair your breathing with your bracing. Follow those guidelines and practice practice practice! Your goal is to be able to simultaneously contract the deep core/pelvic floor with movement or a basic core brace. Right now the pelvic floor is probably “turned off” for most activities you perform. This will change that!
#2 Deep Core Leg Slides
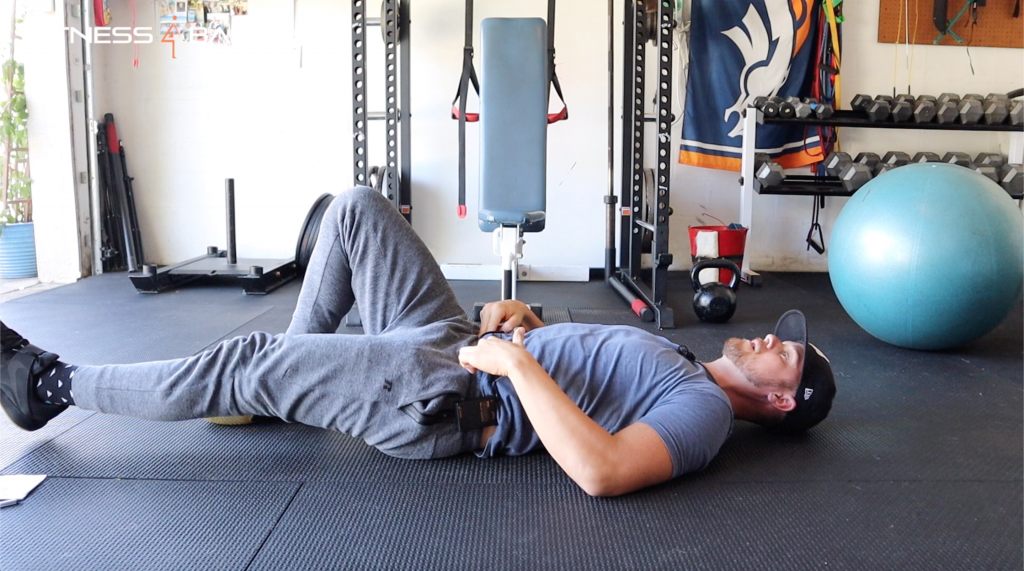
Muscle Group Worked: Deep Core (Transverse, Pelvic floor)
How Much Should I do?: 2-3 Sets of 10 each leg
The set up:
This exercise is designed to start bridging the gap between static core exercises and movement. What tends to happen with some people is their trunk or “core” turns off when movements start which leads to compensations or in some cases the lower back taking over to “brace” the trunk. For this exercise, you are in the same position as before but now you are adding in a leg slide to test your ability to keep the deep core engaged as you start to move.
Lay flat on your back with your knees bent as you see in the image above. Bring your pelvis neutral and make sure your ribs are pulled down. No need for a brace here just make sure your trunk is aligned. Take your two hands and slide your pointer and middle finger over the top of the boney spots on the front of your pelvis (you can see this in the video better). You will know your fingers are in place when you move over that boney structure and you feel that same landmark now at the base of your fingers.
The Movement:
Once set, the movement will be all in the leg you choose to start with. In this variation, you are just sliding on the heel to the point where the leg is stretched completely out. Once you are all the way out take a deep breath and slowly bring the leg back to its starting place.
What to look for:
The big takeaway with these exercises is being able to coordinate your core bracing with your breathing and movement. After a spinal fusion, this type of work is critical to keep your body from taking over and causing stiffness and tightness around the area for no reason. You’re proving to your body that you are strong and capable of movement without pain or injury. This is key!
#3 Stability Ball Dead Bugs
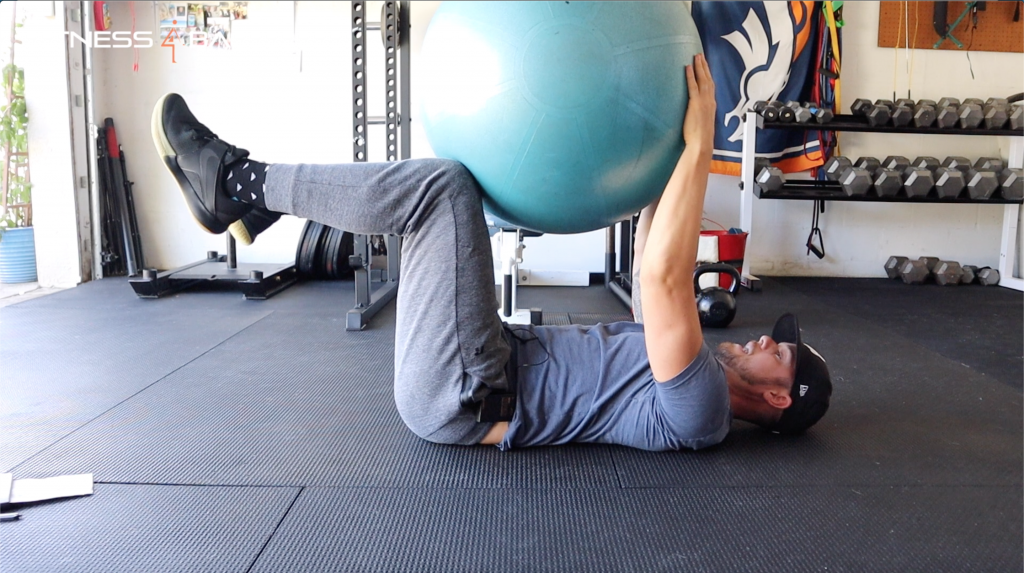
Muscle Group Worked: Entire Core/Trunk
How Much Should I do?: 2-3 Sets of 8 each side
The set up:
Alright, so we are getting a little more challenging now. If you are not able to do this exercise symptom-free I suggest leaving it out. If you are more advanced or don’t experience any symptoms doing this then keep it up! For those after a spinal fusion feel free to stack up enough support under your spine to help with comfort. You can double up on mats or have a couple rolled up towels for each side of your spine while the spine runs down the middle between the towels. Being on a hard floor can cause some unwanted pressure points or pain so try these or modify them to fit your needs.
The Movement:
The movement for this exercise is all in the limbs (legs and arms). After a spinal fusion, you want to build stability around the fused area and learn to train the area with a neutral position. This helps not only build resilience but protects you from doing unnecessary trunk flexion to “build strength” around your spine.
Once the ball is in position you are going to compress the ball with the right leg and left arm while dropping the opposite arm and leg down to the ground.
This is core coordination on crack.
Not only are you using the trunk to compress the ball with your stationary limbs but you’re allowing movement in the hip and shoulder by dropping out the arm and leg. Don’t forget to breathe with a braced trunk!
What to look for:
What you don’t want to happen is to lose your focus on the core while you move the limbs. Again, we are working on coordination in the trunk with movement. So you need to be able to brace, breathe and move the limbs without any breakdown of the brace around your spine. If you have had a spinal fusion and doing the full dead bug is too much you can check out these dead bug variations
#4 Bird Dogs
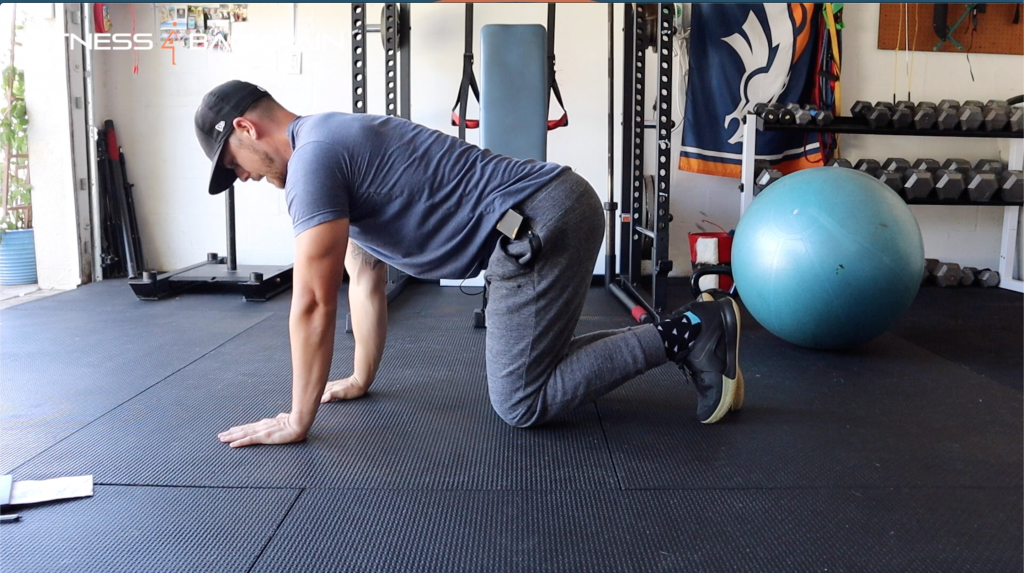
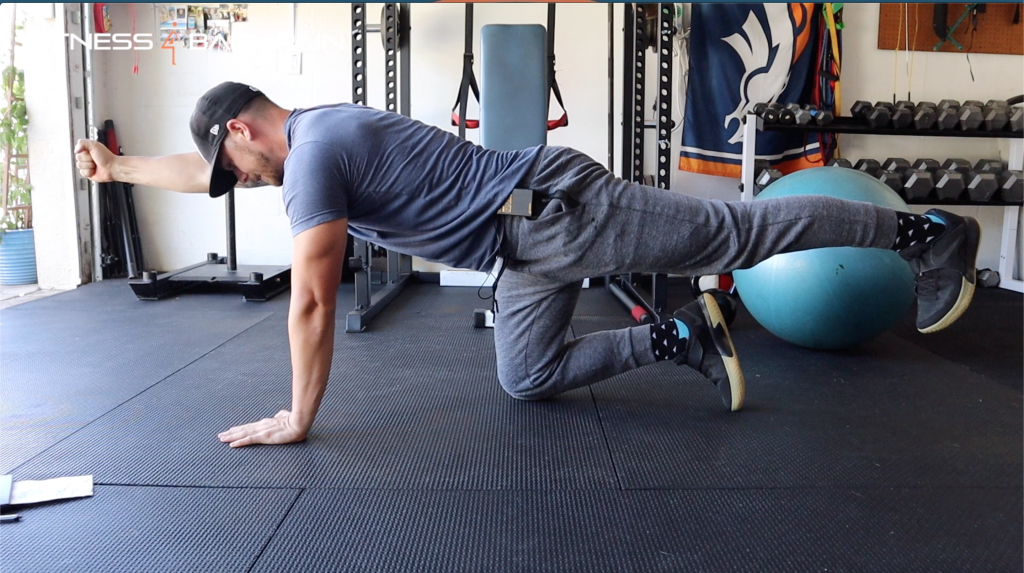
Muscle Group Worked: Core/Trunk, Posterior Chain
How Much Should I do?: 2-3 Sets of 8-10 with 6-8 second holds at the top
The set up:
The bird dog for post-spinal fusions is a great way to learn what a neutral pelvis and spine feel like, along with full-body stiffness. To start this exercise you will be on-all-4’s like you see in the image above. Before liftoff be sure to put the pelvis and lumbar spine in a neutral position with a slight brace in the trunk.
The Movement:
The video goes into detail on the movement you are trying to do here but the key points are driving the legs and arms out NOT up. You often see these being done terribly wrong when people are going up with their limbs causing their lumbar spines to extend. We want to create stiffness with our outstretched limbs while keeping a neutral position (see the picture).
What to look for:
This comes down to looking for a straight line from the fist to the heel. You want to be as straight as possible creating tension throughout the body. Be sure to check the video above for a more detailed approach to the position of the bird dog after a spinal fusion!
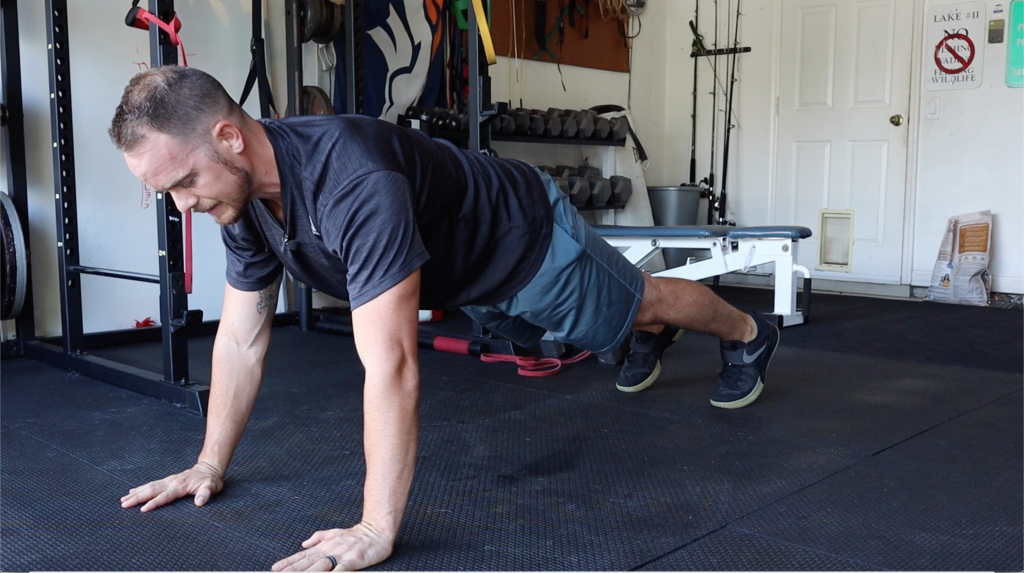
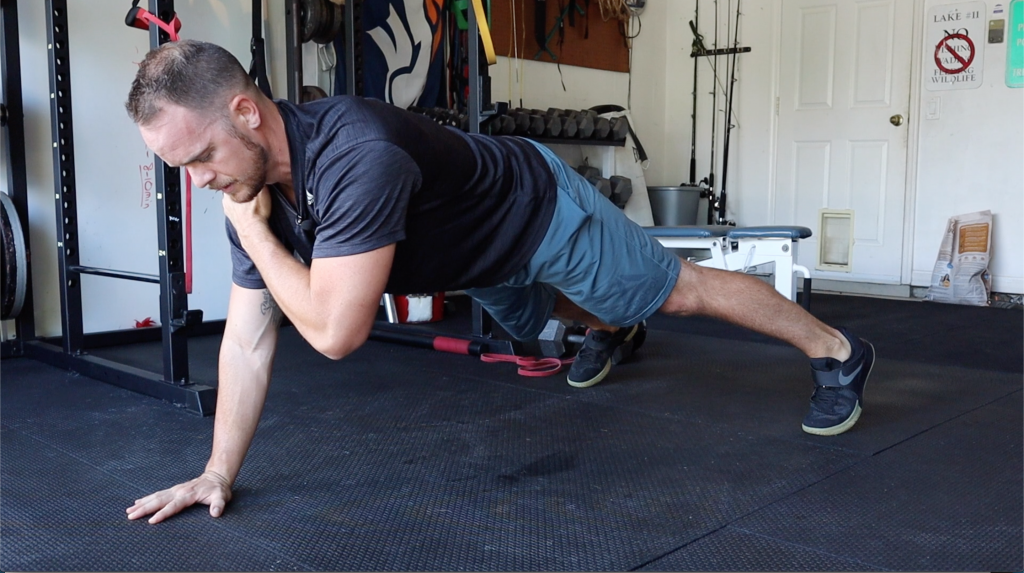
#5 Slow Bear Marches/Crawl For Spinal Fusions
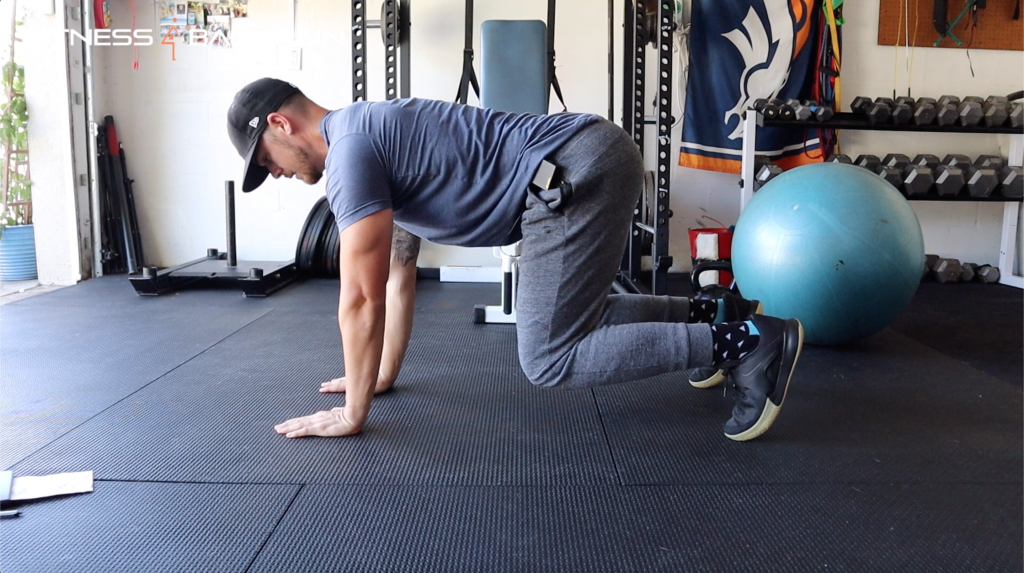
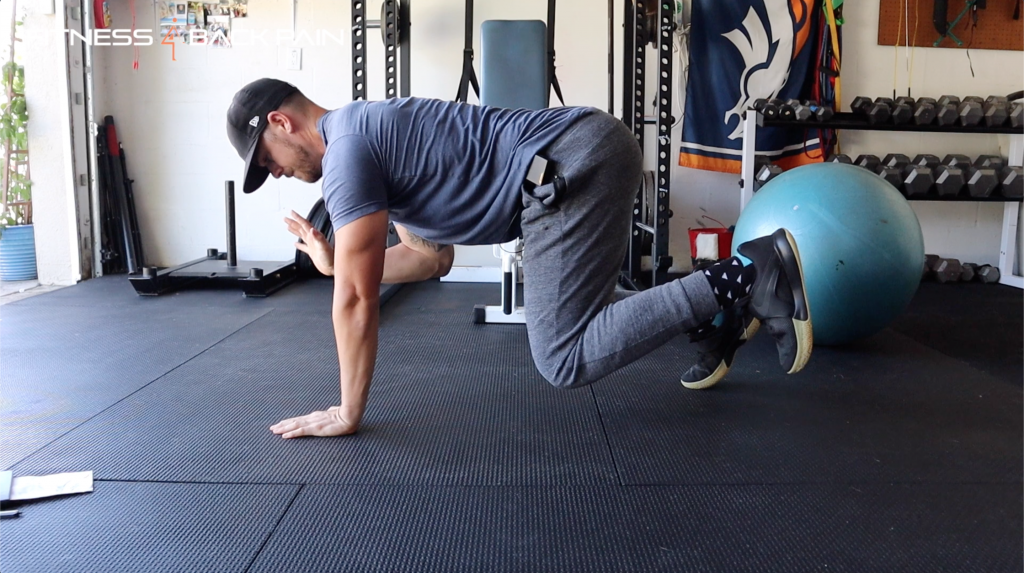
Muscle Group Worked: Trunk/Core
How Much Should I do?: 2-3 Sets of 8 or 35-45 sec crawls
The set up:
After a spinal fusion, your exercises want to eliminate any unnecessary twisting or flexing of the spine. This exercise is designed to have more of an anti-extension anti-rotation aspect to it. The slow bear march/crawls look super easy but it’s tough especially if your core strength and coordination are weak. For this exercise, you are starting on your hands and knees and lifting off onto your toes like you see in the left picture.
The Movement:
For the static bear march, you’re staying in one place and lifting the opposite arm and leg off the ground while maintaining a balanced neutral position. If the static bear march isn’t your thing you can try the bear crawls which are a little more forgiving for some. For the crawls, you are essentially doing the same thing except you’re moving forward instead of staying in one place. This is another awesome exercise to challenge a neutral position and core brace with movement.
What to look for:
With this exercise, you want to maintain a neutral position and good brace with movement. A tool you see me use for the position aspect of this exercise is the softball. The more this ball rolls around or rolls off the worse you are doing. If you can keep this ball from rolling off or having too much movement then you are doing great!
#6 Straight Arm Plank
Muscle Group Worked: Core/Trunk
How Much Should I do?: 2-3 Sets of 10 or 35-45 seconds time
The set up:
The straight arm plank is very similar to the front plank but in my opinion, it’s a bit easier to manage for most people when you compare the two. When you’re dealing with training the core after a spinal fusion you want to feel confident and in control the entire time and doing planks this way makes you feel more in control.
To get set up you are going to get into a normal plank position except for this one you will have your arms straight out as if you were going to be doing a push-up.
The Movement:
Once you are in position spread your feet out a little wider than normal (narrow stance will make it a little harder). Once set you will slowly bring your right hand to your left shoulder hold for 2 seconds and return it back to the starting position. You will repeat this on both sides!
What to look for:
You are looking for stability. You want to be able to go from side to side without your hips shifting or needing to shift your weight noticeably from side to side. This takes practice and should be done slowly so make sure you don’t cheat!
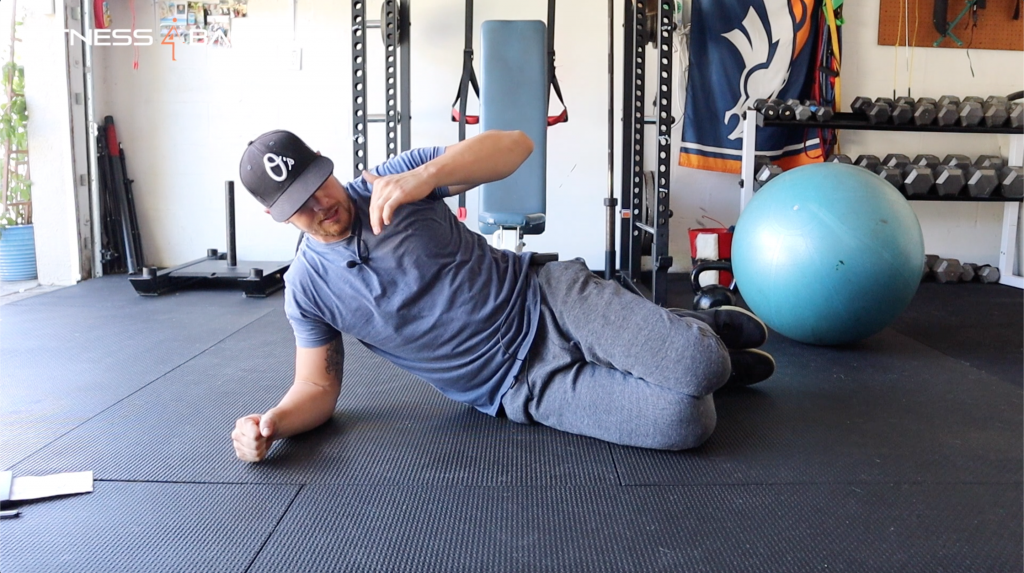
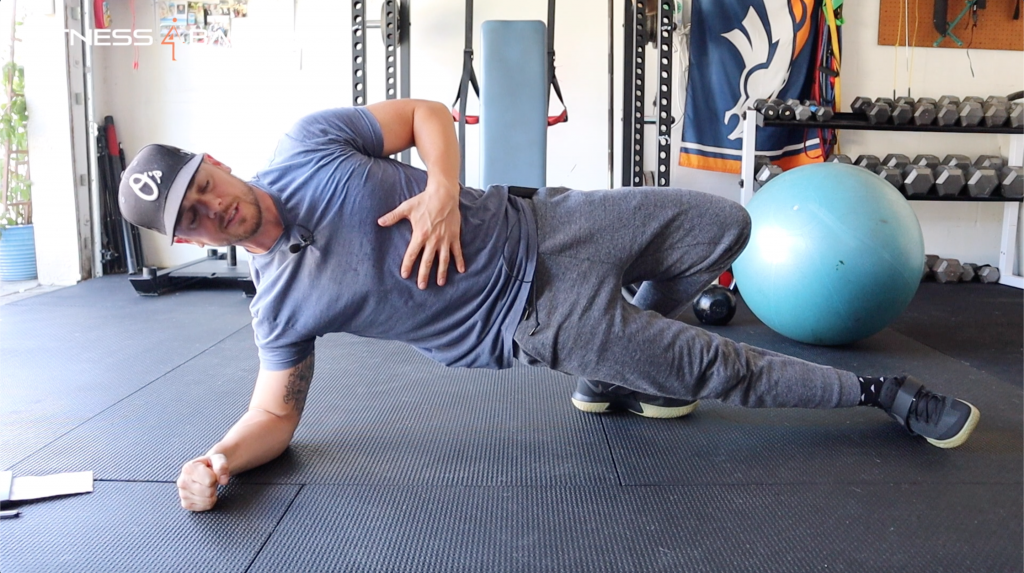
#7 Side Planks For Spinal Fusions
Muscle Group Worked: Core/Trunk
How Much Should I do?: 2-3 Sets of 35-55 seconds
The set up:
The plank is a household name so I am confident you have seen one before. I do want to point out a few things and make sure you know you have options as far as modifications. For this exercise, we will be doing the full side plank. Start by lying flat on your side with your legs scissored about 2-3 feet away from each other. Prop your upper body up spreading the weight over your elbow, forearm, and hand (make sure this is an even weight distribution).
Play around with your leg position. I coach it a few different ways depending on the individual so don’t worry if it contradicts what I say in the video or what you see in the pictures. Do what feels best for you.
The Movement:
When ready slowly brace the trunk and lift the body into the plank position. Hold this and slowly breath. Hold it for the desired amount of time and return back to the resting position.
What to look for:
When resting keep the segment of the body from your head to your hips in a straight line. So, you don’t want to be sagging in the middle while you wait to get into the full plank position. People with sensitive lower backs will often complain of pain in this waiting position. So be mindful and make sure you’re not doing anything to trigger any discomfort.
#8 Banded Sit Backs
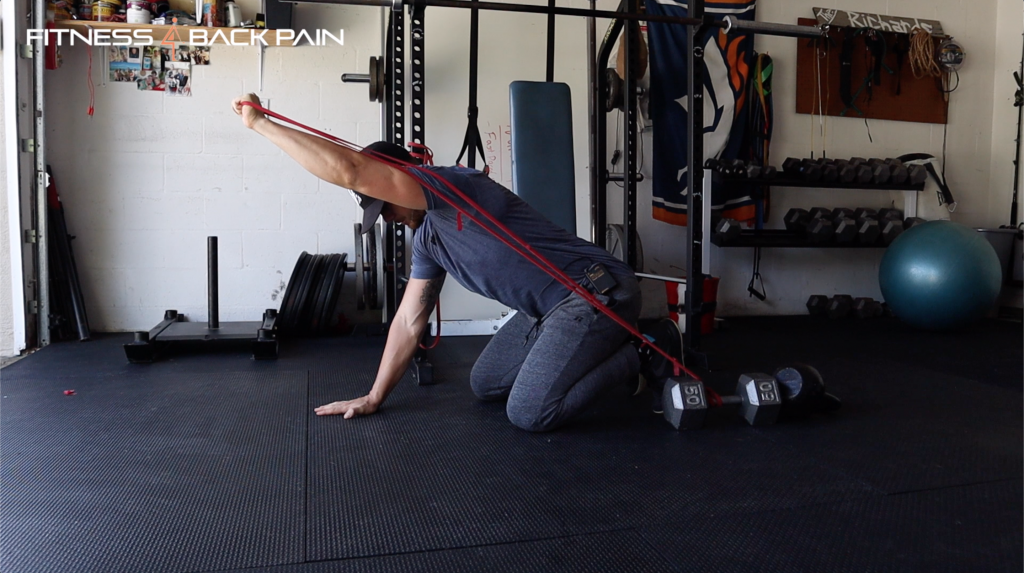
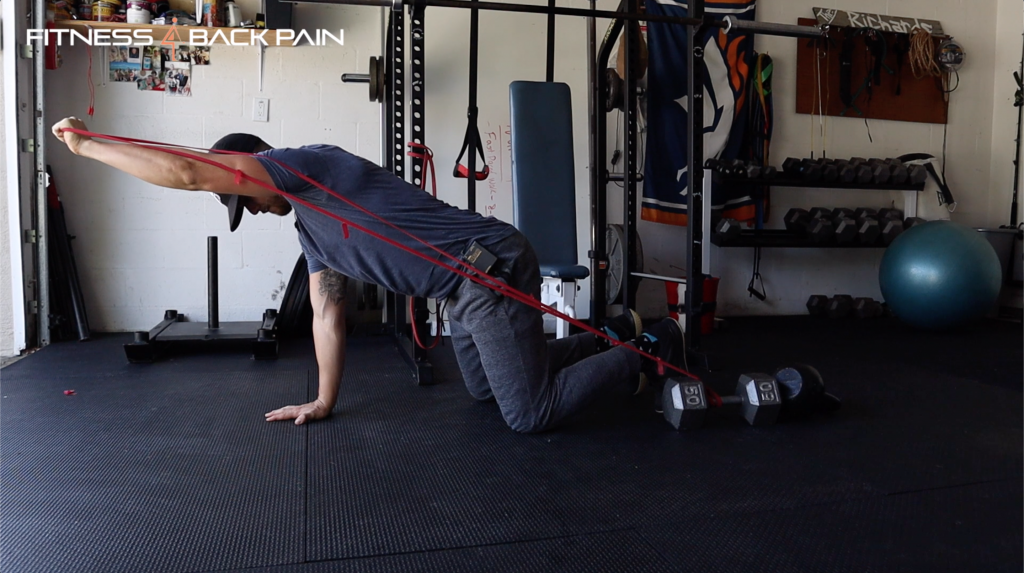
Muscle Group Worked: Core/Trunk
How Much Should I do?: 2-3 Sets of 10
The set up:
When you’re doing core exercises after a spinal fusion you want to challenge the muscles around the area without putting the spine under any unnecessary stress. This banded hinge is a great way to train core strength, endurance, and coordination in your trunk and pelvic floor.
For this exercise, you are going to attach a band to the base of a rig or pole and get onto your hands and knees with the band a little bit behind the foot. The further forward you are from the band the higher the tension will be.
For the beginner level grab the loose end of the band and place the hand right at the top of the shoulder. This will be your starting position!
The Movement:
When in position the motion will come from the hips. So you are essentially practicing your hip hinge while on your knees except this band is adding resistance to one side of the body forcing the trunk to fire and keep you stable.
To complete the rep you will start in the back position and end in the outstretched position. You will do the same with the more difficult version having your arm out straight while hinging (see the video for the demo!).
What to look for:
What you want to watch out for is overextension in the lumbar spine. If you have a solid understanding of how to hip hinge then the rest should be pretty easy for you to do. Keep the core braced but relax the lumbar spine. Allow it to do its own thing without you over contracting it trying to create more stability then you need.
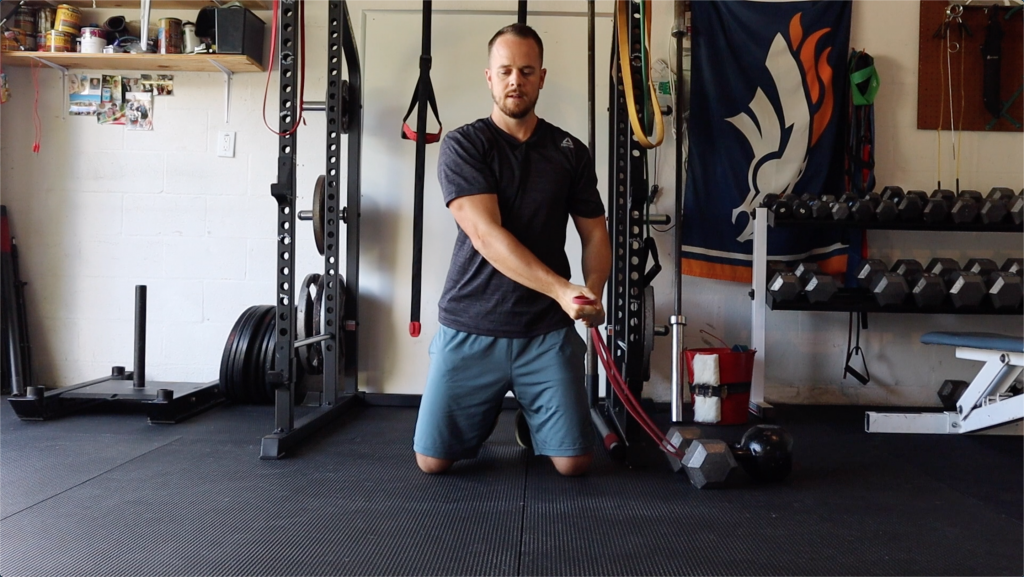
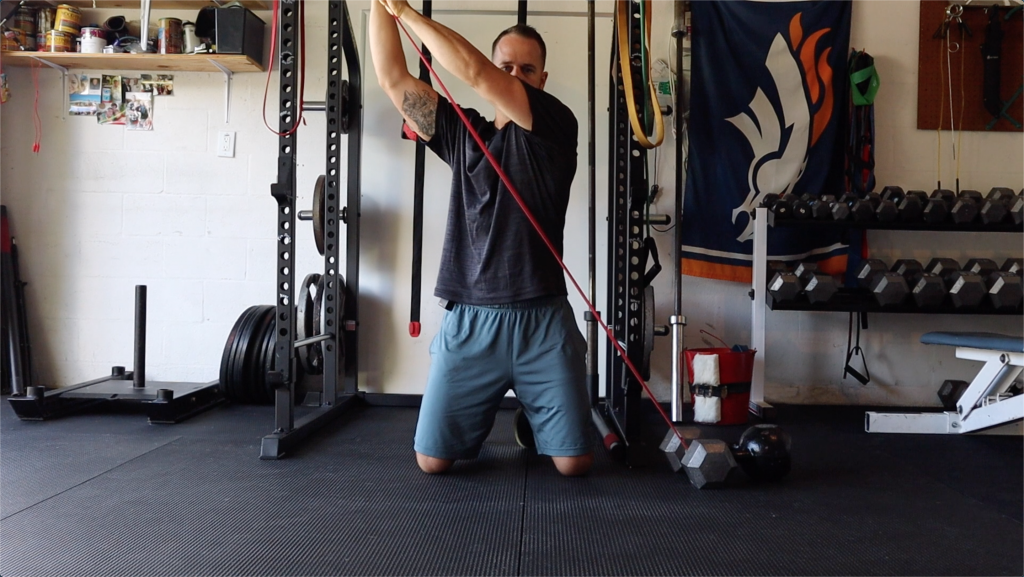
#9 Paloff Press For Spinal Fusions
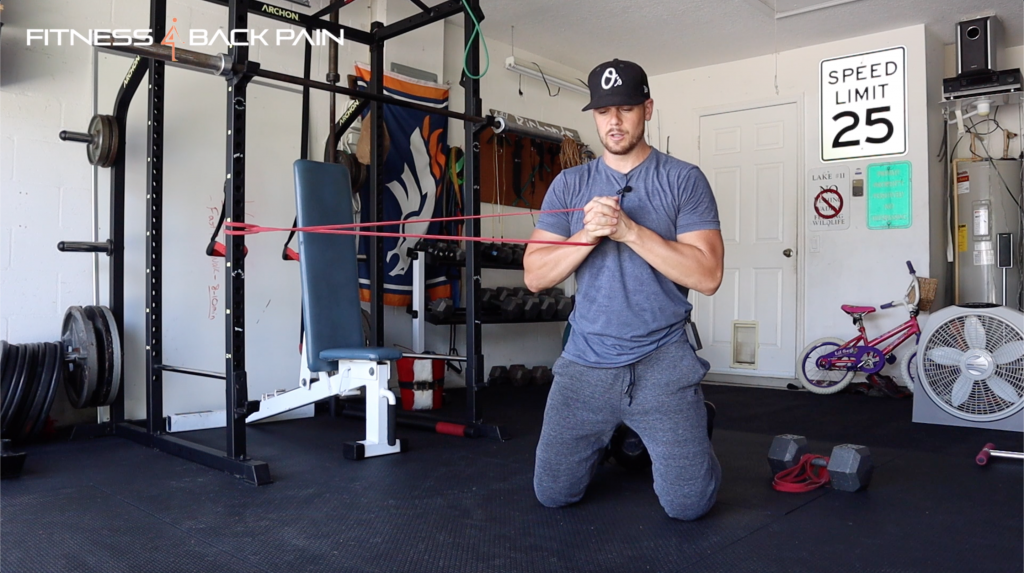
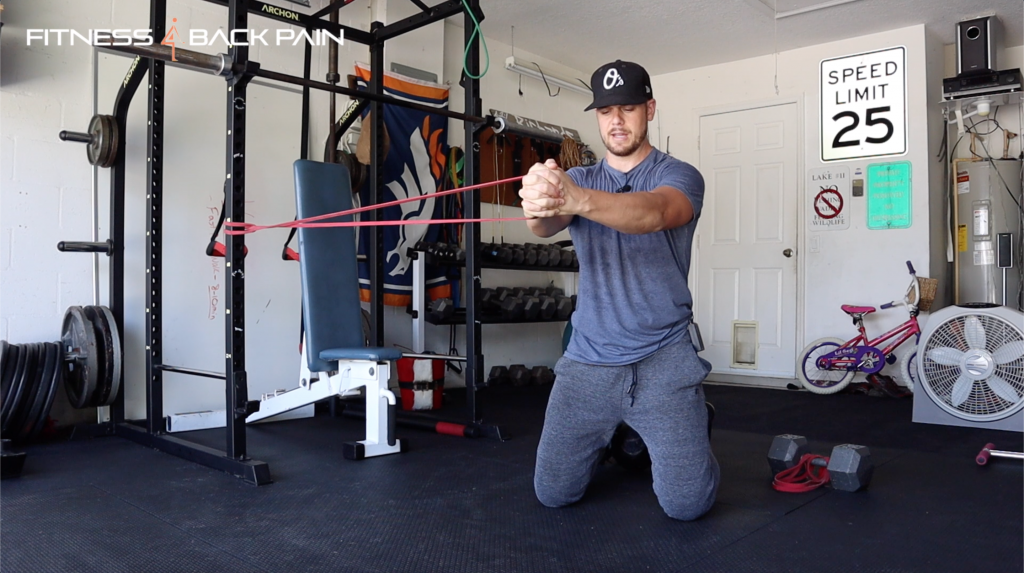
Muscle Group Worked: Core/Trunk
How Much Should I do?: 2-3 Sets of 10-12
The set up:
Again, the Paloff Press is another excellent core exercise to do after a spinal fusion. It challenges the trunk to stabilize while keeping the spine in a neutral position!
You can do these on your knees or standing whichever fits you best. Attach the band so that it comes out around chest height. The further away you are from the rig with the band the more tension you will build up. Grasp the band at your chest and you are set to start.
The Movement:
For the most basic version of this, you are just pressing out in front of you. Starting at your chest slowly press straight out. How far you press out will be determined by your comfort levels so pick a distance that is challenging but does not cause pain.
What to look for:
When training the core after a spinal fusion you want to build endurance around a neutral spine. The more tired you get the more your form and brace will suffer. So you’re looking for that breaking point. As you get tired and start to notice your form breaking call it quits and rest until the next set. You always want to train perfect form and not just push past what your body can manage.
#10 Up Chops
Muscle Group Worked: Core/Trunk
How Much Should I do?: 2-3 Sets of 10-12
The set up:
The Wood Chops also known as Up & Down Chops are a great way to challenge the core after a spinal fusion. The focus stays on building endurance around the spine while keeping the area safe and away from unwanted flexion or rotation.
You can do these on your knees as you see in the picture, in the on-one-knee position or standing. Pick a variation that works for you and stick with it. For all variations, you will have the band attached to the base of your rig and pulling up and away
The Movement:
Once the band is set you will grab the band and pull up and away from where the band is attached on the floor. This is for the “Up Chop”. For the Down Chop you will be reversing this. You really can’t mess this up if you watch the video all the way through and pick up on the coaching cues!
That’s it! My top 10 core exercises to do after a spinal fusion!
Whew! That’s a lot but this is one of the best resources you can save and share with your friends when it comes to training the core after a spinal fusion. The key thing to remember is to focus on building endurance in the trunk and train the spine in a neutral position. As you get stronger and more time has passed you can add more difficult variations in but no need to push the envelop too soon!
What do you think of these 10? Am I missing any you think needs to be added in? Let me know below!
Be sure to share this with as many people as you know! There isn’t a lot of good info out there for those with a spinal fusion!
Addicted to your health,
William

One year ago I had spinal fusion T10-S1 with pins to each pelvis. My sciatica is gone, but my back muscles feel stiff, tight, and hurt. I am 67 yo, 5’10”, 200 lb (used to be 280 lb before doing a Paleo diet for the past 3 years). Will the “Core Essentials” and “Mobility Essentials” programs on Fitness4BackPain be appropriate in my situation? The surgeon has cleared me for exercise but advised me not to do any running or jumping. My family physician wants to prescribe muscle relaxants for my back discomfort/tightness, but I do not like taking them because of how foggy them make me feel and they don’t really address the issue. Thanks in advance.
I’m not sure if you still answer to people but about 2 years ago I had spinal fusion surgery correcting my very severe scoliosis leaving me with only my L4 and L5 not fused I’m never in pain but I’m wanting know of some core exercises I can do
Hey Jordan,
This video shows you 10 you can start with and see how your body responds. If you want more of a progressive program taking you from start to finish specialized for those in your situation I would check out http://www.fitness4backpain.com/CoreEssentials
William
I have been fused from t1 to s1. After six months I am still struggling and using a walker. Therapy 3x per week and walking with walker a mile at least 4 days per week. Am now fighting neuropathy. What advise can you give me. Thanks
I have had a spinal fusion L4-5, L5-S1 as well as bilateral total hip replacements. I need to get on a good exercise regime for flexibility and strengthening. What would recommend to someone in my situation? My fusion was Sept of 2019.
Thanks,
FAncey
Hey Fancey!
If you have been cleared to exercise I point most people in your shoes to my Smart Strength Membership. After checking that out feel free to reach out to me with any questions.
William
Can you do mountain climbers when you have a lower lumbar spinal fusion?
There are some modified mountain climbers you can do that are best for sensitive low backs. Don’t take your knees past 90 degrees and use a bench to put your hands on. Not on the floor. You can adjust and modify it from there.
I would like to sign up for your course. I had a spinal fusion of l4 and l5 two years ago and never did the core exercises. I’m always in pain when I bend, lift or sit without support. I saw my surgeon since I want to start riding my bicycle again. He advised me that I can ride and I need to build my core.
Do you address spinal fusion issues in your course?
Hey Sara!!
I replied to your email! I gave you some more details and thoughts on it being the perfect fit.
William